

A great omelette feels like a small luxury: soft, fluffy, and full of flavor. The best part? You can make one in about five minutes with just a few pantry basics.
No fancy tools, no complicated steps—just simple technique that works every time. This version gives you that classic hotel-style finish: tender eggs, a creamy center, and a clean fold. Whether you’re cooking for yourself or impressing someone else, this is the kind of breakfast that never fails.

Why This Recipe Works
Warm pan, cool butter: Starting with a well-heated nonstick pan and adding butter just before the eggs ensures a silky, nonstick surface and gentle browning without scorching.
Whisking with a splash of dairy: A little milk, cream, or water loosens the eggs and traps steam, making the omelette light and fluffy instead of dense.
Gentle agitation: Quick, small stirs at the start set tiny curds that stay soft, while a final smooth pass across the pan creates a unified sheet for folding.
Residual heat finish: Turning off the heat early lets the center set without drying out, giving you that custardy hotel-style texture.
Shopping List
- Eggs: 2–3 large per omelette (3 for a fuller, hotel-style portion)
- Dairy: 1–2 teaspoons milk, half-and-half, or water
- Butter: 1 tablespoon (or use ghee for a nutty flavor)
- Salt: Fine sea salt or kosher salt
- Black pepper: Freshly ground
- Cheese (optional): Gruyère, cheddar, feta, goat cheese, or Parmesan
- Fresh herbs (optional): Chives, parsley, dill, or basil
- Fillings (optional): Cooked mushrooms, onions, bell peppers, spinach, ham, smoked salmon, tomatoes (seeded), or olives
- Cooking oil (optional): A teaspoon of neutral oil to stabilize butter at higher heat
Instructions

- Prep fillings first. If using vegetables or meats, cook and season them ahead of time.
Keep them warm and dry (excess moisture makes eggs runny).
- Beat the eggs. Crack 2–3 eggs into a bowl. Add 1–2 teaspoons milk, cream, or water, a pinch of salt, and pepper. Whisk with a fork until the mix looks even and slightly foamy—about 15–20 seconds.
- Heat the pan. Place a nonstick 8–10 inch skillet over medium heat.
When the pan is hot, add 1 tablespoon butter (with a little oil if you like). Swirl until it foams and coats the surface.
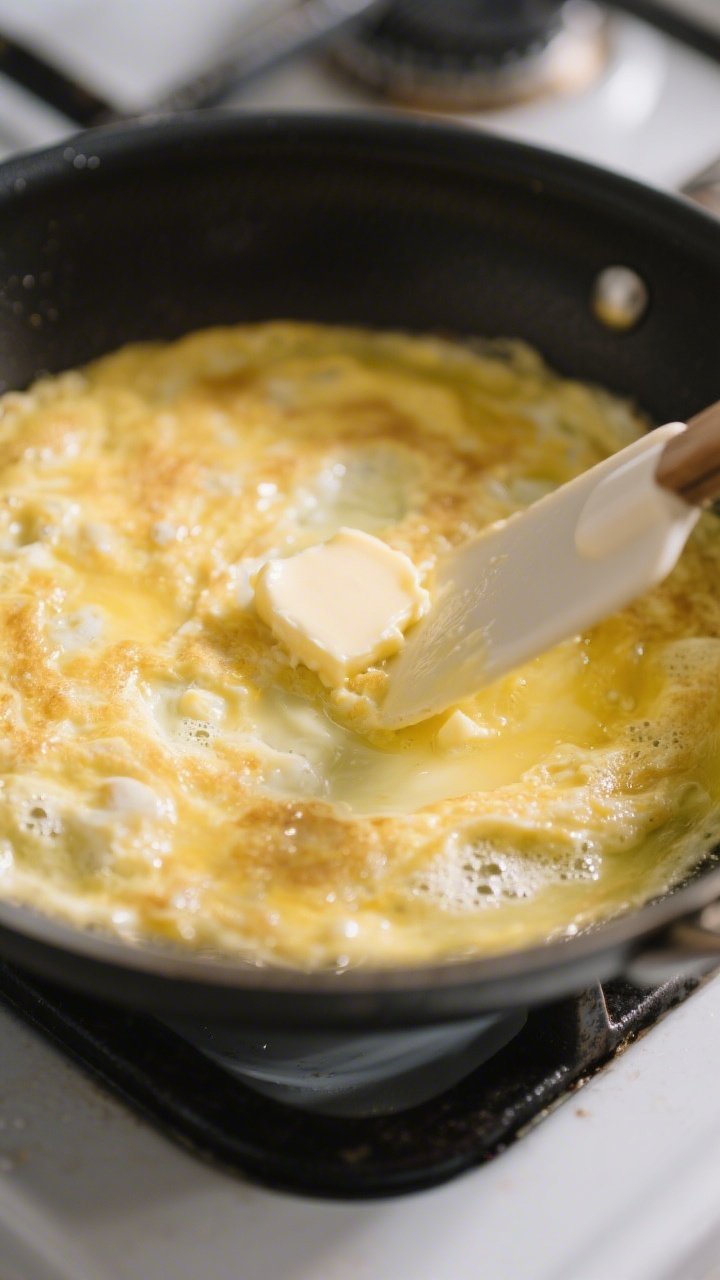
- Pour and stir. Add the eggs. Immediately use a silicone spatula to make small, quick circles, pulling set egg from the edges toward the center.
Tilt the pan to let uncooked egg flow to open spots. Do this for about 20–30 seconds.
- Smooth and set. When most of the eggs are softly set but still glossy on top, stop stirring. Gently smooth the surface into an even layer.
- Add fillings. Place cheese and prepared fillings on one half of the omelette. Don’t overload—2–3 tablespoons total is plenty for a neat fold.
- Finish with gentle heat. Turn the heat to low or off.
Let the residual heat soften the cheese and finish setting the eggs for 15–30 seconds. The center should look creamy, not wet.
- Fold and plate. Use the spatula to fold the bare half over the fillings. Tilt the pan and slide the omelette onto a warm plate, seam side down.
Brush with a tiny bit of melted butter if you want a glossy finish.
- Garnish and serve. Top with chopped chives, a pinch of salt, and pepper. Serve immediately.
Storage Instructions
- Best fresh: Omelettes are at their peak right off the stove. The texture changes quickly as they cool.
- Short-term hold: If you must hold it, tent loosely with foil for up to 10 minutes.
Avoid sealing tightly—steam makes it soggy.
- Refrigeration: Store leftovers in an airtight container for up to 24 hours. Reheat gently in a nonstick pan over low heat with a little butter. Expect a firmer texture.
- Make-ahead tip: Prep fillings in advance and keep eggs whisked in the fridge (covered) for up to 24 hours.
Cook to order in minutes.

Why This is Good for You
- Protein-rich: Eggs provide high-quality protein that keeps you full and supports muscle repair.
- Healthy fats: Using a measured amount of butter or olive oil delivers satiety and flavor without excess.
- Customizable veggies: Add spinach, peppers, or mushrooms for fiber, vitamins, and minerals.
- Low in refined carbs: Ideal for steady energy, especially when paired with fruit or a side salad.
What Not to Do
- Don’t use high heat. It scorches the bottom and leaves the inside raw. Medium is your friend.
- Don’t overbeat. You want air, not froth. Overmixing can make eggs tough.
- Don’t overfill. Too many fillings will tear the omelette and make it watery.
- Don’t walk away. Eggs cook fast.
Stay with the pan for that perfect, soft set.
- Don’t salt too late. Season the eggs before they hit the pan for even flavor.
Variations You Can Try
- Classic French (plain or fines herbes): No browning, tender and pale. Finish with chives, parsley, and tarragon.
- Cheddar and Chive: Sharp cheddar inside, chives on top. Simple and always good.
- Mushroom and Gruyère: Sauté mushrooms with a pinch of salt and thyme.
Add Gruyère for a nutty, melty center.
- Spinach and Feta: Wilt spinach, squeeze out moisture, then add feta for a savory, tangy finish.
- Western-Style: Diced ham, peppers, and onions (pre-cooked). Cheddar optional.
- Smoked Salmon and Dill: Add a spoon of cream cheese and fresh dill. Season lightly—salmon is salty.
- Tomato and Basil: Use seeded cherry tomatoes to avoid excess liquid.
Finish with Parmesan.
FAQ
Should I use water, milk, or cream?
Any of the three works. Water creates the fluffiest texture by steaming; milk is a balanced option; cream gives a richer, silkier finish. Use just 1–2 teaspoons per 2–3 eggs.
What size pan is best for a 2–3 egg omelette?
An 8-inch nonstick skillet is ideal for 2 eggs; a 9–10 inch skillet works well for 3 eggs.
A larger pan spreads the eggs too thin and dries them out.
Why is my omelette browning?
The heat is too high or the pan wasn’t ready before adding butter. Cook over medium heat and add the eggs as soon as the butter foams but before it browns deeply.
Can I make an omelette without nonstick cookware?
Yes, with a well-seasoned carbon-steel or cast-iron pan and enough butter. Still, nonstick makes the process easier and more reliable for beginners.
How do I keep fillings from making the omelette watery?
Cook vegetables first to drive off moisture and pat them dry.
Seed juicy items like tomatoes. Add fillings sparingly and only once the eggs are mostly set.
How do I know when to fold?
When the surface is still slightly glossy but no longer runny, you’re ready. If it looks dry, you’ve waited too long.
Can I double the recipe?
Make omelettes one at a time for best texture.
If cooking for a crowd, keep finished omelettes warm on a low oven (200°F/95°C) for a few minutes, loosely tented with foil.
Is it safe to eat the center slightly soft?
Yes, as long as the eggs are cooked to a custardy set. You’re aiming for soft and creamy, not liquid. If unsure, leave it on low heat a few seconds longer.
Final Thoughts
A great omelette isn’t about tricks—it’s about control: steady heat, gentle stirring, and a light hand with fillings.
With this simple method, you’ll get that soft, hotel-style texture every time. Keep your ingredients prepped, your pan hot, and your timing short. Breakfast in five minutes, and it feels like a treat.
Printable Recipe Card
Want just the essential recipe details without scrolling through the article? Get our printable recipe card with just the ingredients and instructions.